Microsoft has a program for all engineer employees to get some free Azure credit to play with. Having been with Microsoft for two summer internships I have accumulated two separate accounts with $150 of credit/month each. Growing up pinching pennies, I am not one to let anything free go to waste, so for the past couple years I have been using my Azure credit for some fun stuff.
1. NextCloud Personal Cloud Storage 
NextCloud is super cool if you haven’t heard of it. It’s basically open-source Dropbox with some extra features, and you can self-host it. When I got my free credit, I thought I’d try and save some money on Dropbox by self-hosting NextCloud on Azure. Here’s what I used:
- Virtual Machine: Ubuntu 18 LTS on a VM with 2 vCPUs and 8gb of ram. I also added a data disk with 500gb of the cheapest HDD storage. It took some time to set up everything. The tutorials that were most helpful were this one from NextCloud about installing on Linux and this one from Microsoft on getting the data disk attached to the VM in the right place.
I used my NextCloud setup for a couple of weeks, and it worked great! I would definitely recommend trying it out. The whole server cost was about $90/month, so it was well within my $150 allotment. Ultimately, I felt a little nervous about having all my data on a platform that I could potentially mess up and lose everything. Also, Microsoft 365 with 1tb of storage is only $15/year for employees, so I decided to go with that.
2. Patient Preview 
After my first summer with Microsoft, I took a class on software business. During that course I built web app that doctors could use to pre-screen risky patients. I have a rundown of my full-stack process in this other blog post. Here’s the TL;DR:
- Main Web App: VueJS front-end and NodeJS back-end with Azure App Service. Also, a crazy overkill CI/CD pipeline with Azure DevOps.
- Database: Azure MySQL Server. Really like the managed DB by the way.
- WordPress site: Azure App Service. 0/10, go with a hosting provider that focuses on WordPress.
- Data Ingestion: Azure Functions. Simple enough.
- Domain: You can buy domains with free Azure credit!!
Check out the blog post or check out what’s left of patientpreviewapp.com
3. Minecraft Server 
This one scored me big points in the eyes of my nephews. Minecraft, as I have come to learn, is not just a kid’s game. The development community behind Minecraft is massive and growing. I found it easy to jump in and get started by standing up my own Minecraft server. Here’s how I did it:
- Virtual Machine: I used a familiar config with Ubuntu on 2 vCPUs and 8gb of ram. I skipped the extra storage for this one though, as Minecraft worlds aren’t very large. For the server software, I used the first party software from Mojang. You can use either the Java Edition or the Bedrock edition. I followed the steps to install Java and the server software from this tutorial.
I learned a lot with this project, and I didn’t even scratch the surface of what’s possible with mods and third-party server software. One useful tip for working with VMs is to use the VSCode extension “Remote – SSH”. I’m more comfortable in VSCode than I am in a command line SSH workflow, so this was super helpful for me.
4. AirMessage Server 
Don’t tell Tim Apple about this one
AirMessage is a software that allows you to use iMessage on an Android phone. The catch is that you have to have a computer running MacOS on all the time as a go-between. Well, at the time I didn’t have an Apple computer, so I had the idea to emulate one on Azure. This was much harder than I was anticipating. Full disclosure, I got it to work but not in a very practical way. Here’s how I (kinda) did it:
- Virtual machine: I tried a bunch of different machines of varying sizes running different operating systems. The only one that eventually worked was a beefy 4 vCPU 16gb of ram setup running Ubuntu. This machine also enabled nested virtualization, which was required. These things run for $170/month on Azure, so it wasn’t sustainable, but I just wanted to get it to work once.
Its not common to run a virtual MacOS machine on a virtual Linux machine. I wasn’t having any luck and couldn’t find any help on the web. After searching different Hackintosh and AirMessage forums for days and banging my head against the keyboard for more days, I found this git repo: https://github.com/kholia/OSX-KVM. Here you can find a step-by-step guide for setting up MacOS on Linux with a virtualization software called QEMU. This still assumes a physical Linux machine but it was actually usable for my virtual setup. The outcome wasn’t ideal though. Now I can see why nobody does this kind of nested virtualization. Even on my larger Linux virtual machine with 16gb of ram MacOS runs incredibly slow. Like, moving the mouse has 10 seconds of latency and the screen refreshes once every other second. Installing MacOS took five painful hours.
After all the setup, I sent one glorious iMessage to my wife to prove that I could and then killed the VM. Later that week I bought a used Mac Mini for $50.
5. Tealeaf 
A friend came to me with an idea to predict the stock market using deep learning. He is a Senior in his machine learning program at college has been specializing in natural language processing. He had built a custom language model based on the WallStreetBets subreddit. This was July 2020 before everything went crazy. Well, we started working on the idea and training a bunch more models and we finally released an early version of it in February 2021. Check it out at tealeaf.live. Here are the Azure resources we used:
- Machine learning: For training all our models we used Azure Machine Learning Studio. Most of it wasn’t through the UI, we mostly used their python SDK. First we provisioned a training cluster with GPUs and then connected to it when training our models. It took us a few tries to get this right. We ended up using Azure’s low priority compute units because we were able to get more ram for a lower price. Specifically we used this one:

Training costs a lot. Can you see where in this graph we train our models?
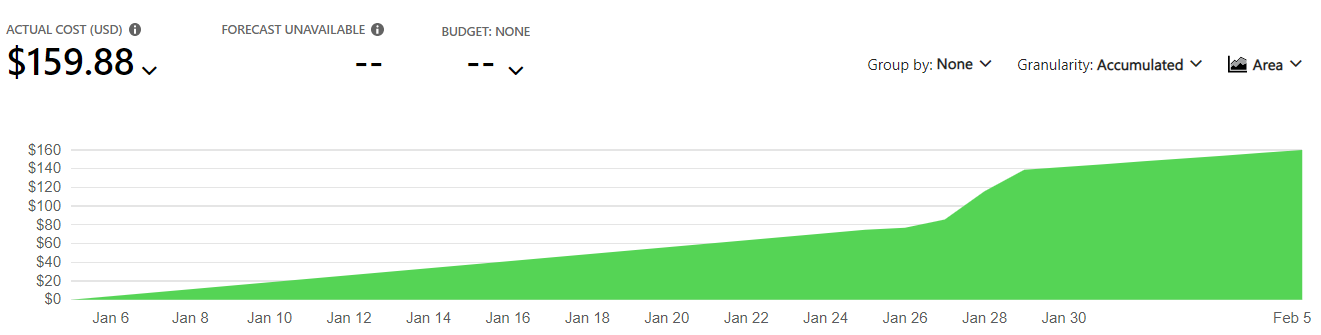
The past 2 months we have actually been over our $150 limit and had to spend our own money *gasp*. Microsoft has successfully turned my freeloading around and made some money off me. Cheeky.
Inferencing: After training our models, we put them on an Azure Virtual Machine to make inferences about the stock market. For this VM we use Windows Server instead of Linux because it was easier to just log in, install PyCharm, and run everything the same as we do locally. I’m sure there is a better way to do this, maybe with async functions, but I couldn’t figure out how to get our multi-gigabyte model files to deploy nicely. For now the VM is expensive but it works.
Web app: VueJS and Node again. I’ve gotten pretty comfortable with this setup and was able to reuse some components from Patient Preview. I simplified my CI/CD though. The back-end is manually deployed to an Azure Web App and the front-end is actually using Netlify. Netlify is just so user friendly and makes domain and SSL management a piece of cake. I have moderately high hopes for Azure’s upcoming Static Web Apps offering but currently Netlify is just better.
I’m still working on this project and would love any feedback you might have. tealeaf.live
That’s about it so far. I have no idea how long my free credits will last but I’m not about to ask. I’ll just enjoy it while I can. And I have enjoyed it. I’ve been able to play with things that otherwise would have been way out of my budget. And even though I would be able to afford some of the stuff on here, it all adds up and it’s nice to not have to worry about that.
If you have any free cloud provider credits lying around, I highly recommend using them. I’ve learned a ton in the process and you might too.
Subscribe for very infrequent updates about what I’m up to.